
Fly Tying
now browsing by category
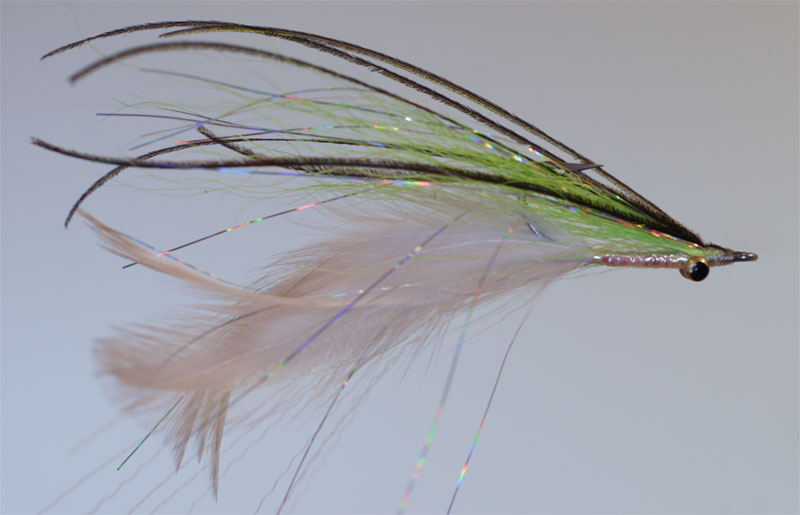
Half and Half
Half And Half |
|
Another baitfish imitation. |
|
|
|
|
Materials |
|
| Hook | 2/0 SS |
| Thread | Clear 3/0 (spook thread) |
| Tail | 4 White Hen Hackle’s and Crystal Flash |
| Body | Pearlescent Flash |
| Wing | Chartreuse Buck tail Topped with Peacock Herl or Gray Bucktail |
| Thread | Dumbbell Eyes |
Tying Instructions |
|
| 1) Tie in the Dumbbell eyes behind the eye leaving room for the head.
2) Tie in 4 Hackles either side of hook bend at barb and wrap forward to behind eyes. Tie in a few strands of Crystal flash either side of hackle. 3) Tie in Pearlescent flash above barb and wrap forward to behind eyes. Secure with thread. Can be reinforced with super glue to make the fly more durable. 4) When this has dried. Reverse the hook in the jaws and tie in a small bunch of Chartreuse buck tail in front of the eyes. At this point a few strands of flash can be added. 5) Tie in a few strands of peacock herl or the grey buck tail to complete the wing. 6) Finish off the head and apply your favourite head cement. Paint the eyes if desired. |
|
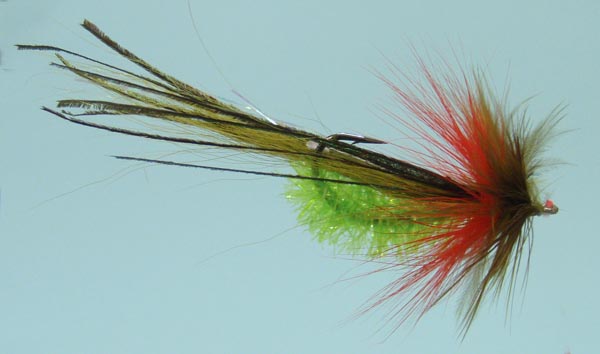
Backwater Bass Bent Back
Backwater Bass Bent Back |
|
|
|
|
Materials |
|
| Hook | Stinger 2/0 or bigger |
| Thread | Red or Olive 3/0 |
| Flash | Of Choice |
| Body | Chartreuse Cactus Chenille |
| Tail | Olive Buck tail and Peacock Hurl |
| Head | Red and Olive Hackle |
Tying Instructions |
|
| 1) Prepare the hook by putting in a slight bend about 1/3 from eye. Bend just enough to get the hook to swim point up.
2) Starting right from within the bend of the hook wrap the cactus chenille forward to the bend and tie off. 3) Tie in a clump of buck tail on top of the shank at the bend. (hook point up). This must extend beyond the hook and also acts as a weed guard by protecting the hook point. 4) Tie in some flash above the buck tail. This can be slightly longer than the buck tail.. 5) Top of with 5 or 6 peacock hurls. 6) Just ahead of the Buck tail tie in a red hackle buy the base, curved side down and wrap forward in tight turns forming a neat collar. 7) Just in front of the red repeat with an Olive hackle. 8) Form a neat thread head, whip finish and cement. |
|
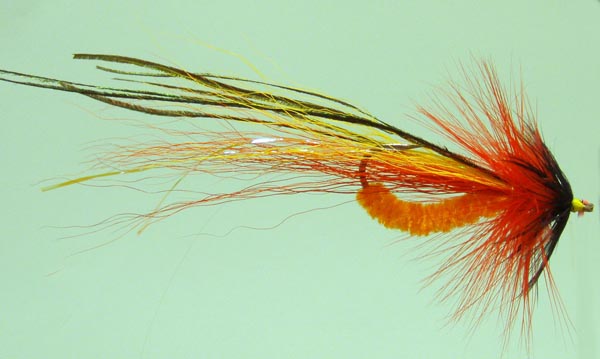
Variation |
|
|
|
|
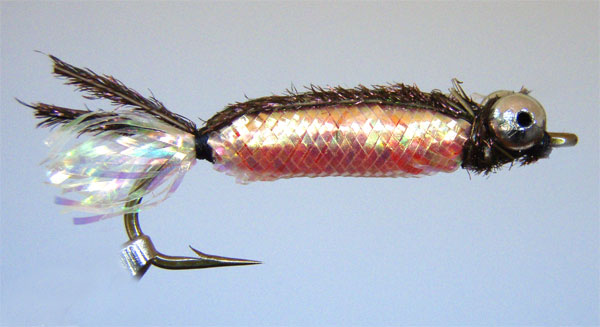
Fry Fly
Fry Fly |
|
This fly, designed and tied by Kevin Cole, works well in estuaries. |
|
|
|
|
Materials |
|
| Hook | Long Shank #10 to #6 |
| Thread | Black 3/0 |
| Tail | Pearlescent Mylar Tube |
| Body | Red wool or Tuft chenille under mylar tube topped with Peacock Herl |
| Eyes | Silver Bead Chain |
| Head | Peacock herl Wrapped around eyes |
| Weight | A few turns of lead behind the eyes under the wool body if required. |
Tying Instructions |
|
| 1) Wrap the red wool or chenille along the length of the hook forming a slightly tapered body from the barb to the head leaving enough room for the eyes. Tie off the thread. A lateral line can be drawn with black felt tip pen onto the wool if desired.2) Cut a piece of mylar tube slightly longer than the length of the hook. Remove the core and slip over the body.
3) Tie a few wraps of thread around the mylar just in front of the wool body. 4) Tie in the bead chain eyes at this point with figure of 8 wraps. 5) Just behind the eyes tie in 5 strands of peacock herl. 6) Take 1 strand and wrap it around the tying thread a few times. Then wrap around the eyes forming the head. Whip finish just behind the hook eye and tie off. 7) Wrap the thread around the mylar tube above the hook barb . Tease out the mylar behind this point forming the tail. 8) Pull the 4 remaining pieces of peacock herl over the top of the body, secure with a few wraps of thread and tie off. 9)Trim the herl and tail to length. |
|
Fishing Instructions |
|
| Fish this fly with a sinking line into the wind using a long strip followed by a pause. This causes a jigging action and simulates a small fish struggling in the current caused by the wind. | |
Surf Puff
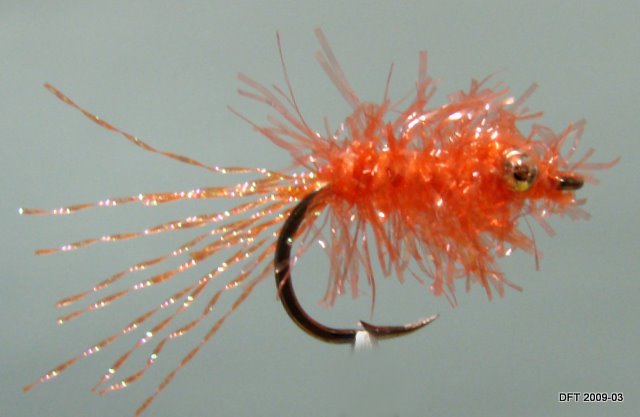
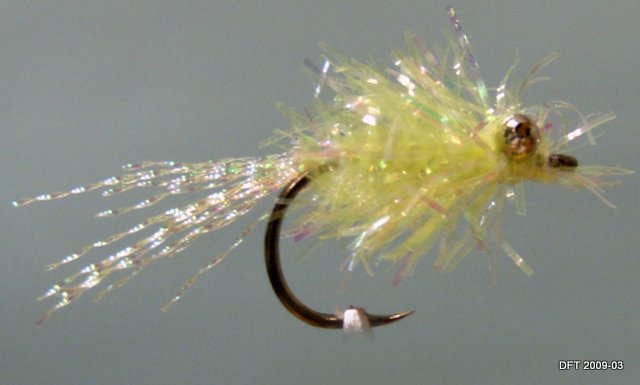
Surf Puff |
|
|
|
|
Materials |
|
| Hook | Daiichi DH55 #2 to #4 |
| Thread | 3/0 To match Cactus Chenille |
| Eyes | Bead chain |
| Body | Cactus Chenille Burnt Orange, Pearl, Chartreuse etc. |
| Tail | Flash to match Cactus chenille |
Tying Instructions |
|
| 1) Dress shank of hook and tie in bead chain eyes.
2) Tie in the flash Above the barb. 3) At the same point tie in the cactus chenille. 4) Wrap the chenille forward to the eyes. 5) Tie off and form a neat thread head. |
|
Variation |
|
|
|
|
No Name Nymph
No Name Nymph |
|
This fly designed by Roger Baert was tied for us at the July 2007 meeting by Paul Leisegang |
|
|
|
|
Materials |
|
| Hook | Nymph #10 to #6 |
| Thread | Brown or Black 6/0 |
| Tail | Cock Hackle Short and Krystal Flash |
| Body | Short fibre synthetic Dubbing such as Antron (Sparse) |
| Rib | Gold Oval Tinsel |
| Thorax | Same as body (Heavier Application) |
| Wing Case | Swiss Straw – Raffia |
| Legs | Pick out underside of Thorax |
| Weight | Can be weighted with a few turns of lead if required. |
Tying Instructions |
|
| If Required wrap 5 or 6 turns of lead around shank and position leading edge just under 1/2 way down shank.Dress the hook with tying thread to above the barb.Tie in a small bunch of the cock hackle for the tail at this point with a strand of krystal flash either side.Tie in the gold rib and clip into the material holder.
Lightly apply tack to the thread and touch the dubbing lightly to the thread. DO NOT OVER DUB. Now roll the dubbing onto the thread and wind up to about 2/3 from hook eye leaving space for thorax and head. Wrap the gold tinsel forward to this point and tie off . Tie in the raffia pointing back. Dub the thread more heavily this time and wrap forward forming the thorax. This should be fatter than the rear body section. Leave enough room for the head. Pull the raffia forward over the thorax to form a neat wing case and tie off. Form a small neat head with the thread and varnish with head cement. Pick out the dubbing under the thorax for the legs. |
|

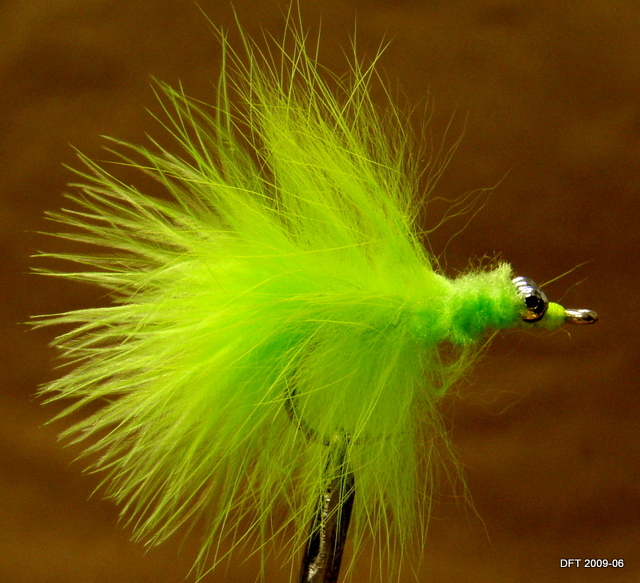
Tarpon Toad
Tarpon Toad |
|
|
|
|
Materials |
|
| Hook | Gamagatsu SC15 1/0-2/0 |
| Thread | 3/0 or finer colour to match |
| Head | Bead Chain |
| Tail | Marabou |
| Body | Zonker Strip |
| Front Body | Wool |
Tying Instructions |
|
| 1) Dress shank of hook and tie in Bead Chain behind the hook eye.
2) Tie in a bunch marabou above the barb. 3) Tie in the Zonker in front of the marabou and give 2 wraps forward toward the hook eye and tie off. Make sure the fibres are not trapped. 4) Tie in short lengths of yarn at 90 deg to the shank using figure of 8 method. 5) Repeat this process right up to the bead chain eyes. 6) Trim the yarn evenly to shape the body. 7) Form a neat thread head in front of the bead chain and whip finish. 8) This fly can be fished in the surf zone with as sinking line as well as letting it drift in deeper water. |
|
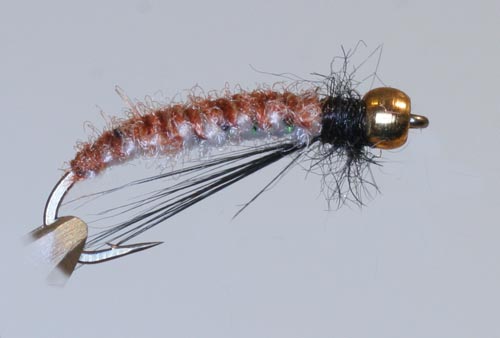
Polish Nymph
Polish Nymph |
|
Fly tied by Jay Smit at the April 2007 meeting |
|
|
|
|
Materials |
|
| Hook | 3x curved nymph #10 – 14 |
| Thread | Hyperfine black or any suitable fine thread |
| Head | Brass Bead |
| Upper Body | Use rubber legs |
| Body | Two colours of thin wool or Fine Dubbed thread |
| Rib | Optional Clear Mono |
| Legs | Black Hackle |
| Thorax | Fine Rabbit |
| Weight | 6 turns Siman square lead (size dependant on weighting required) |
Tying Instructions |
|
| Wrap 6 turns of square lead around shank and position leading edge 1/2 way down shank. Leave about 1 to 2 mm gap between lead and bead.Using 3/0 or heavier floss form wrap around lead forming a tapered body and tie off.Using a pair of pliers gently flatten the body in a horizontal plane.
Using the 6/0 thread tie in a rubber leg by its tip on the left side of the body nearest the head. Tie in all along the left side of the body and secure just behind the tapered body formed earlier. Snip off the excess leg and repeat on the right side of the body. Tie in one of the wool threads just behind the bead and tie in all along the left side of the body on top of the rubber going all the way back to behind the barb. Repeat with other colour wool on the right side of the body. Tie off the thread. The wool should be at least 150mm long. For details of the Polish weave method go to http://flyguysoutfitting.com/shuttleweave.html Invert he fly in the vice. (hook now upside down) Holding the lighter piece of wool in the left hand and the Darker in the right pull the Lighter over the body to the right, down and slightly back under your right hand. Now bring the Darker wool (Right Hand) slightly forward over the Lighter wool and down under the body and slightly up and back. Your arms should now be crossed with your right arm above the left. Now the tricky bit, keeping constant pressure on the thread bring the Lighter wool left handback over the top of the body and down under the Right hand. Push the left hand slightly back and bring the right hand toward you then down and back across to the right and slightly up always keeping constant tension on the thread. The first weave should now be complete. Repeat all the way up to just behind the bead forming a neat body with one colour on the top of the fly and the other underneath. Tie a simple knot behind the bead to prevent unraveling. Tie in the 6/0 thread just behind he knot. Enough wraps to stop the wool unraveling. Undo the knot in the wool tied earlier and clip away the excess wool in front of the thread. Tie in a small bunch of black hackle for the legs. Lightly apply tack to the thread and touch the dubbing lightly to the thread. DO NOT OVER DUB. Now wind the dubbing up to the bead forming the thorax and tie off. |
|
Elk Hair Caddis Variant
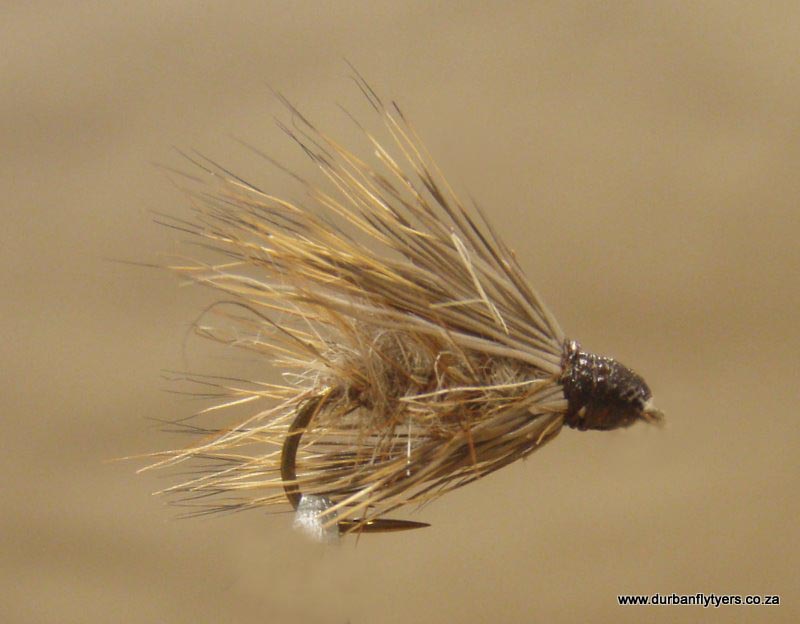
Elk Hair Caddis Variant |
|
This is a dry fly favoured by trout fisherman in small streams |
|
|
|
|
Materials |
|
| Hook | Dry Fly 2x # 12 or # 14 |
| Thread | 6/0 Thread – Brown |
| Body | Natural Rabbit Grey |
| Hackle | Orange Hen |
| Wing | Fine Elk Hair |
Tying Instructions |
|
| Tie in the thread and dress hook down to above the barb.
Take the hackle and stroke from tip to base to get the barbs ar right angles to stem. Tie in the hackle base end above the barb with the tip facing back. Spin a slender dubbing noodle using the rabbit then wrap forward to form the body. Tie off behind the eye leaving room for the head of the fly. Wrap the hackle forward in even turns to the same point and tie off. Take a bunch of elk hair (size to match the hook). Pull out the fluff at the base. Stack in a stacker to get the tips even. Tie in the wing behind the hook eye. The wing should be slightly longer than the hook. Cuta way all the elk hair that extends beyond the hook eye and the form a thread head over the deer hair. |
|
The Bay Glassy
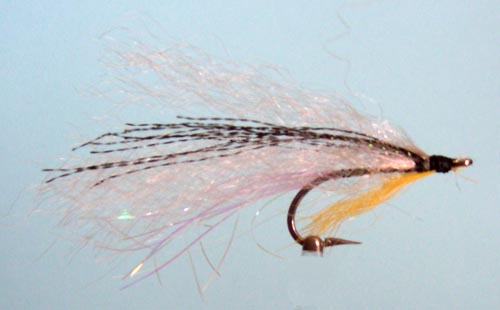
The Bay Glassy |
|
The Bay Glassy tied for us by Russell Coote at the February 2007 Meeting. This is a fly that he tied to imitate the Glassy found in the Durban harbour. This fly caught many species but was primarily used when targeting Springer. |
|
|
|
|
Materials |
|
| Hook | SS Debarbed #4 to 1/0 |
| Thread | Black |
| Tail | A small bunch of Crystal Flash |
| Body | White Kinky Fibre |
| Rib | Black Cotton |
| Lateral Line | Black Flash or Peacock Herl |
| Weight | None |
Tying Instructions |
|
| Tie in the Crystal Flash just behind the hook eye and with a wide thread spiral tie in all the way back to the hook barb and back.Tie in a sparse bunch of the white kinky fibre by the tips behind the hook eye leaving room for the head. Fold the fibre back over the top forming a loop and tie in on top. Snip through the loop.
Tie in a few strand of Black Flash or Peacock herl for the lateral line. Tie in another small bunch of the white kinky fibre on top to complete the body. Make a neat head with the black thread, tie off and varnish. Try and make the head as round as possible because it is meant to simulate the black eye of the glassy. |
|
Fishing Instructions |
|
| Fish this fly very slowly and in some cases when the glassy’s are being smashed by game fish a dead drift works well. | |
Montana Nymph
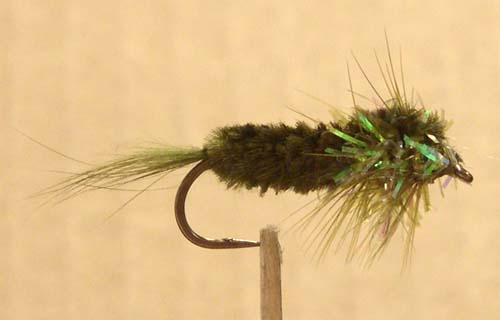
Montana Nymph |
|
|
|
|
Materials |
|
| Hook | Long Shank Nymph 6 to 12 |
| Tail | Rabit Fur Olive or colour of choice |
| Body | Chenille olive or colour of choice |
| Legs | Hackle Olive |
| Thorax | Cactus Chenille |
| Wing Case | Body Colour Chenille |
| Head | Black cotton whip finish and cement |
Tying Instructions |
|
| Dress hook with thread and tie in a small clump of Rabbit fur. Any colour from black olives to brown.Tie in the body chenille and wind forward to 3/4 up the shank. Tie off on top of the hook as this piece will later be used as the wing case.
Tie in a hen hackle at this point (hackle must match gape of hook about 30% wider) Then tie in the cactus chenille wrap forward leaving room for the head and tie off. Wrap the hackle carefully through the thorax about 3 turns and tie off. Pull the body chenille forward over the thorax to form the wing case and tie off at the eye. Make a neat cotton head and cement making sure the eye does not become clogged with cement. Bret gave us a good tip for cleaning the eye of the hook, he pulls the left over piece of hackle through the eye. This cleans it up very nicely. |
|
 D5 Creation