
Yellowfish
now browsing by category
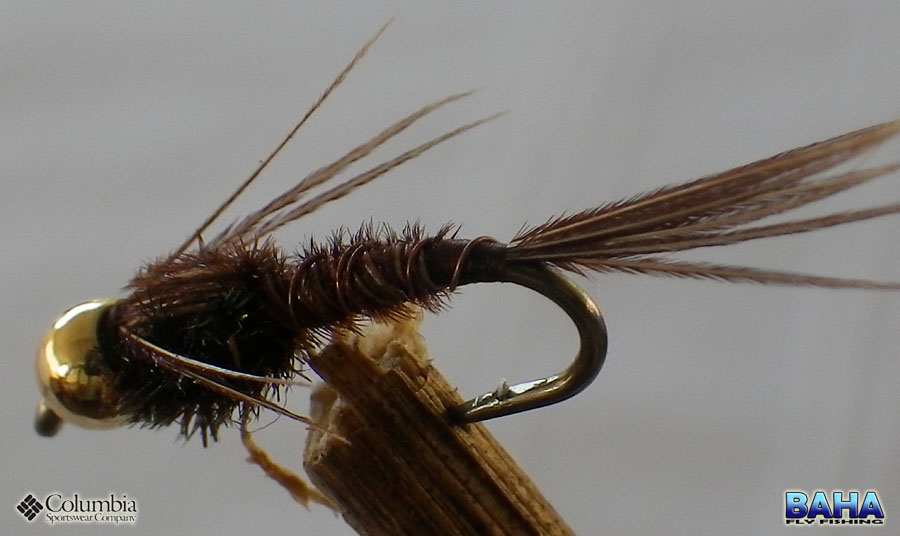
The PTN
The PTN (Pheasant Tailed Nymph) |
|
By Warren Prior |
|
 |
|
Materials |
|
| Hook | #12 – #16 nymph hook (a #14 was used in the demo fly) |
| Thread | Any fine brown thread – The colour must match the colour of the pheasant tail |
| Thorax | Peacock herl (or orange dubbing to tie an orange hot spot) |
| Tail, Body & Wing Casing | Pheasant tail |
| Ribbing | Copper wire |
| Head | An appropriately sized copper bead |
Tying Instructions |
|
| 1) Begin by dropping a bead (I used copped) onto the hook and moving it up to the eye. The bead is important to weight the fly so choose an appropriate bead. Tungsten for example is great for fast moving and deeper waters. Other colour beads can also be experimented with.
2) Dress the hook shank with your chosen thread to provide a solid base to tie the materials onto. Then wind the thread down to the bend of the hook and tie a piece of copper wire which will be used to rib the body and will provide additional strength to the fly. 3) Next tie in around 4 – 6 strands of pheasant tail to create the tail of the fly. Generally the tail should be around the length of the hook shank. 4) Rather than trimming off the pheasant tail (and wasting it) we will use it to form the abdomen. Do so by winding the cotton up the hook to the where you wish the thorax to end (roughly a third of the way down the hook shank from the eye). Now wind the ends of the pheasant tail up to the cotton and tie them off. You can now trim off the remainder. 5) Counter wrap the copper wire over the thorax thus securely trapping it. Tie off the copper wire and trim off any excess. Pheasant tail is a relatively brittle material and often breaks when fighting a fish. This ribbing will therefore give the fly some extra life. Note: Counter wrapping means to wrap in the opposite direction to the material under it. This traps the material more efficiently than wrapping in the same direction. 6) Tie in another 6 strands of pheasant tail by the but, making sure they point towards the tail of the fly. These will be folded over the thorax and will eventually form the wing case and legs. 7) Tie in a few strands of peacock herl and build up a well shaped thorax using them. It should be roughly a third of the length of the fly. Tie these off behind the bead. Note: Dubbing in a thorax instead of using peacock herl provides some great alternative nymphs. If often dub in an orange thorax to tie a form of the orange hot spot for yellowfish. 8) Fold the strands of pheasant tail over the thorax and secure them behind the bead to form the wing casing. 9) At this point you can either cut off the ends of the pheasant tail, or split the strands into 2 groups and fold them down the sides of the fly to form legs. 10) Tie off the fly. You are done. |
|
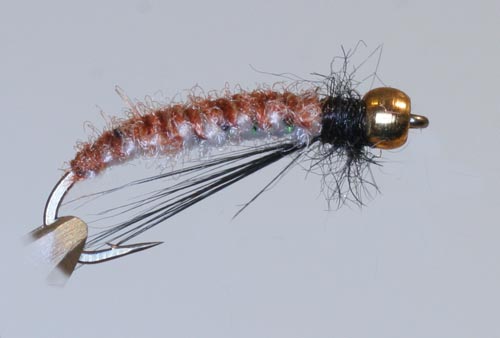
Polish Nymph
Polish Nymph |
|
Fly tied by Jay Smit at the April 2007 meeting |
|
|
|
|
Materials |
|
| Hook | 3x curved nymph #10 – 14 |
| Thread | Hyperfine black or any suitable fine thread |
| Head | Brass Bead |
| Upper Body | Use rubber legs |
| Body | Two colours of thin wool or Fine Dubbed thread |
| Rib | Optional Clear Mono |
| Legs | Black Hackle |
| Thorax | Fine Rabbit |
| Weight | 6 turns Siman square lead (size dependant on weighting required) |
Tying Instructions |
|
| Wrap 6 turns of square lead around shank and position leading edge 1/2 way down shank. Leave about 1 to 2 mm gap between lead and bead.Using 3/0 or heavier floss form wrap around lead forming a tapered body and tie off.Using a pair of pliers gently flatten the body in a horizontal plane.
Using the 6/0 thread tie in a rubber leg by its tip on the left side of the body nearest the head. Tie in all along the left side of the body and secure just behind the tapered body formed earlier. Snip off the excess leg and repeat on the right side of the body. Tie in one of the wool threads just behind the bead and tie in all along the left side of the body on top of the rubber going all the way back to behind the barb. Repeat with other colour wool on the right side of the body. Tie off the thread. The wool should be at least 150mm long. For details of the Polish weave method go to http://flyguysoutfitting.com/shuttleweave.html Invert he fly in the vice. (hook now upside down) Holding the lighter piece of wool in the left hand and the Darker in the right pull the Lighter over the body to the right, down and slightly back under your right hand. Now bring the Darker wool (Right Hand) slightly forward over the Lighter wool and down under the body and slightly up and back. Your arms should now be crossed with your right arm above the left. Now the tricky bit, keeping constant pressure on the thread bring the Lighter wool left handback over the top of the body and down under the Right hand. Push the left hand slightly back and bring the right hand toward you then down and back across to the right and slightly up always keeping constant tension on the thread. The first weave should now be complete. Repeat all the way up to just behind the bead forming a neat body with one colour on the top of the fly and the other underneath. Tie a simple knot behind the bead to prevent unraveling. Tie in the 6/0 thread just behind he knot. Enough wraps to stop the wool unraveling. Undo the knot in the wool tied earlier and clip away the excess wool in front of the thread. Tie in a small bunch of black hackle for the legs. Lightly apply tack to the thread and touch the dubbing lightly to the thread. DO NOT OVER DUB. Now wind the dubbing up to the bead forming the thorax and tie off. |
|
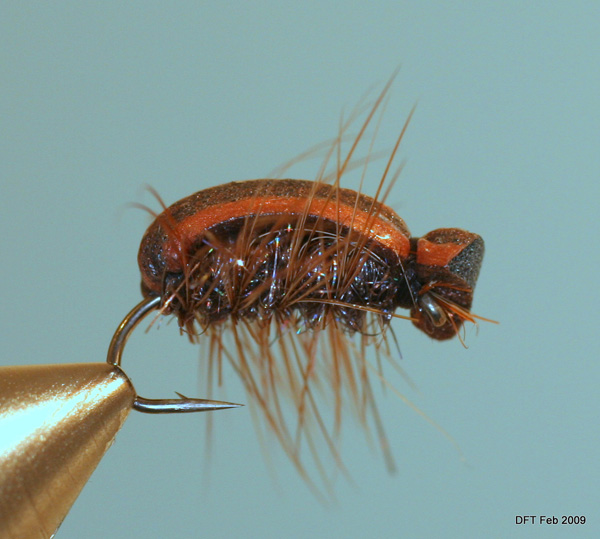
The Good Doc’s Beetle
The Good Doc’s Beetle |
|
A local dry fly that is especially deadly for yellowfish. |
|
|
|
|
Materials |
|
| Hook | Grip 12804 #12 to #16 |
| Thread | Black 3/0 |
| Upper Body | Sparkle Dubbing |
| Body | 2-3 mm Black High Density Foamb |
| Body Prep | Paint with Heritage Metalic Bronze |
| Legs | Brown or Furnace Hackle |
Tying Instructions |
|
| 1) Prepare the foam by cutting into strips with a craft knife. The top should be beveled at 45 deg on both sides. (width to suit hook size)
2) Paint the prepared strips on both sides with the bronz metallic craft paint and hang to dry. Before it hardens give an overcoat of Heritage Seal Skin. 3) Hang the strips to dry. 4) Dress the shank of the hook with thread and before the paint hardens tie in a strip of foam behind the hook eye flat side up. 5) Stretch the foam back toward the bend of the hook and tie down the foam in open turns finishing above the barb with an no. of tight wraps. 6) Strip the filoplume off the hackle and tie in at this point with the tip facing back. 7) Form a dubbing noodle and dub over the foam underbody forward to behind the hook eye. 8) Palmer the hackle forward to the same point and tie off. 9)Pull the foam body over the top and tie off just behind the hook eye. 10) Clip the excess foam forming the beetles head. |
|
MSK (Mikes Scalie Killer)
MSK (Mikes Scalie Killer) |
|
A yellowfish variation of the woolly bugger. |
|
|
|
|
Materials |
|
| Hook | Daiichi DHSS #3 or smaller |
| Thread | Chartreuse 3/0 or finer |
| Head | Tungsten Bead pref. faceted |
| Tail | Filoplume from Schlappen Hackle + Flash |
| Body | Sparkle dubbing |
| Rib | Fine Copper Wire (optional) |
| Wing Case | Flashabou |
| Legs | Teased out dubbing |
Tying Instructions |
|
| 1) Thread bead onto hook and dress the hook shank with thread to above the barb.
2) Cut a bunch of filoplume from the base of a hen hackle. Tie this in above the barb using the pinch method. 3) Tie in one strand of flash either side of tail as well as the copper wire for rib if desired. 4) Form a dubbing noodle at the tail tie in point and wrap forward 2/3 along hook shank forming the body. 5) At this point tie in the flash for the wing case on top of the hook. 6) Carry on dubbing in front of the flash right up to the bead. 7) Pull the flash over the top forming the wing case and tie off behind the bead. 8) Keep wrapping the chartreuse thread behind the bead forming a neat chartreuse band behind the bead. 9)Whip finish and apply a small amount of head cement. 10) This fly is very effective for Natal Scalies especially when the water is not clear and can be tied in browns and greens. |
|
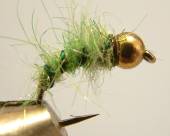
Bead Head Caddis
Bead Head Caddis |
|
This simple fly works well for both Yellowfish and Trout and can be effectively fished in rivers and still waters. |
|
|
|
|
Materials |
|
| Hook | Scud #12 to #16 |
| Thread | To match Dubbing |
| Rib | Green Wire (Gold or Copper) |
| Body | Life Cycle Dubbing Bright Green (Brown,Tan or Olive) |
| Eyes | Brass or Tungsten Bead |
Tying Instructions |
|
| Dress the hook with thread behind the eye until the bead sits snug. Seat with a drop of super glue.Tie in the Rib right back to 1/3 into the bend of the hook.
Form a dubbing loop at this point and spin a tapered dubbing thread. Wind forward to behind Bead forming a tapered curved body. Secure with thread and tie off. Wind the rib forward in the opposite direction and secure behind bead. Apply a tiny bit of super glue to the thread before tying off. |
|
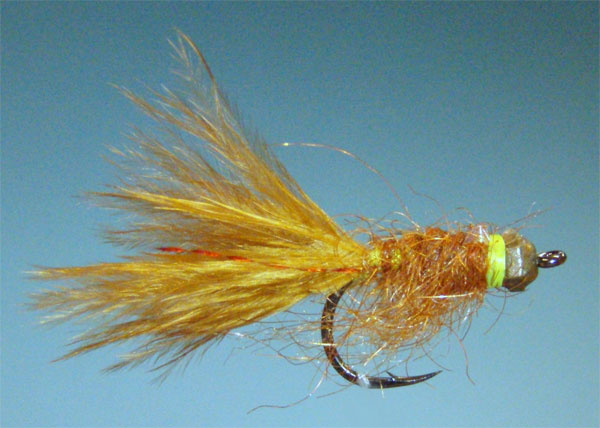
 D5 Creation