
Fly Tying
now browsing by category
The Regulation Of Trout
Introduction
The context that currently applies to the regulation of trout in this country is one of revolutionary change. I say so because the mind-set and vision that informs decisions around trout today cannot be more different than that which applied say 30 years ago.
- 30 years ago trout were a protected species enjoying significant government support.
- Now in law at least they are condemned as invasive aliens and must either be eradicated or controlled for that purpose.
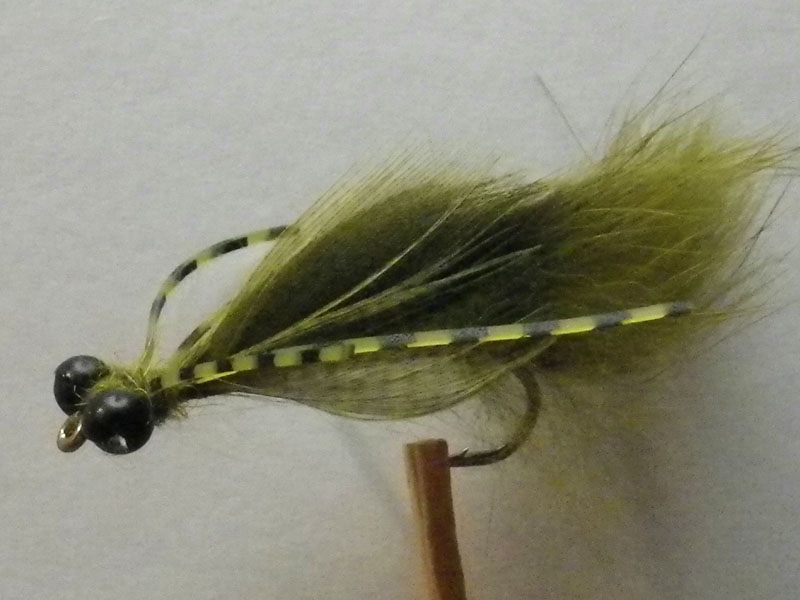
Kamberg Nymph
Kamberg Nymph |
|
By Mike Blackhouse |
|
 |
|
Materials |
|
| Hook | TMC 9300 #10 or equivalent |
| Thread | 3/0 tan or olive |
| Tail | Blood quill marabou olive together with a few Blood Quill marabou fibers in brown |
| Body | Same as for tail |
| Eyes | Tan chenille |
| Weight | 7 to 14 turns of .010 lead wire |
Tying Instructions |
|
| 1) Lay a thread base from the eye to the bend of the hook building up the thread at the bend to support the tail.
2) Tie in the chenille eyes figure of eight style leaving the tags attached to be used later. 3) Wind in 7 to 14 turns of lead wire starting directly behind the eyes wrapping towards the bend. 4) Tie in olive and brown blood quill marabou. The tail should be 1.5 length of the hook shank. Make sure that the tail is tied in behind the thread mounting at the bend of the hook so it stands up proud and tail wrap is largely avoided. 5) Twist and wrap the rest of the marabou fibers back to the eye of the hook. Pull hard on the thread as you tie off so that the fly does not become unwound during use. 6) You will find that there is a very small gap between the tie off point and the eyes which will be filled with dubbed olive and brown marabou fibers. The next move is to tie off between the chenille eyes and at the eye of the hook. 7) It is important to have a good quality pair of curved scissors as the tail needs be cut to shape of a dragon abdomen and also this helps further to avoid tail wrap. |
|
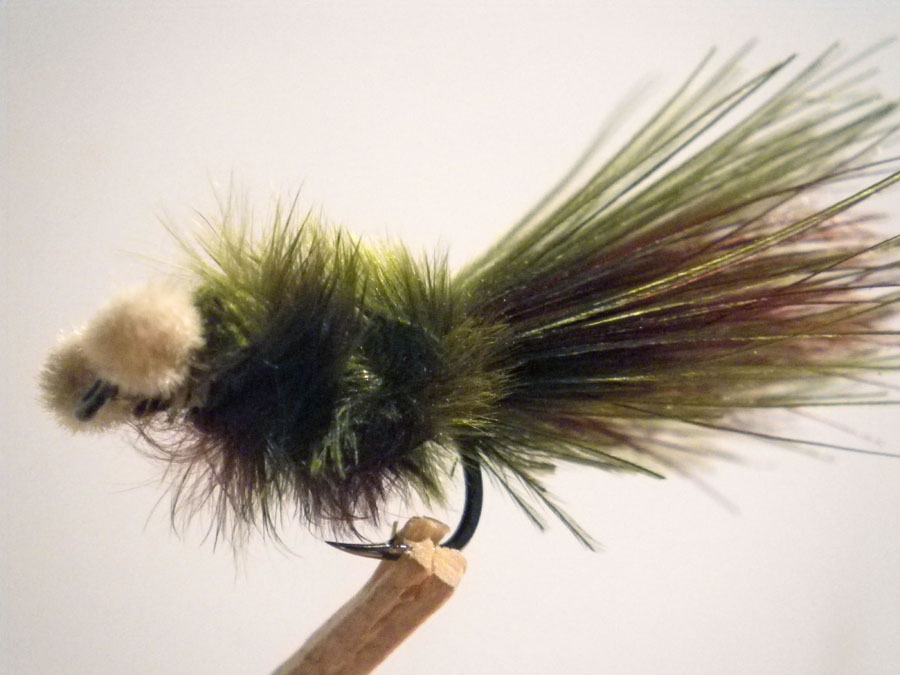
Papa Roach
Papa Roach |
|
By Marco Breschi |
|
 |
|
Materials |
|
| Hook | 3X shank-wide gape (wet/nymph type) in #6 or #8 |
| Thread | Olive or brown 0/6 |
| Tail | Zonker strip (part of the body) |
| Body | Olive or brown zonker strip (preferably short fibred) |
| Eyes | Large black, round plastic beads |
| Wing case | Olive or brown Mallard breast feathers (2 on each side) |
| Thorax/head | Olive/brown dubbing mixed with fur from zonker |
| Legs | Round rubber in olive or brown |
Tying Instructions |
|
| 1) Lay a thread foundation to the gape of the hook and coat with a layer of head cement (Sally Hanson’s).
2) Tie in the eyes just behind the eye of the hook leaving sufficient space for tying off. 3) Select a suitable section of Zonker strip and measure off against the hook shank allowing only 3-4 mm skin to extend past the hook bend. This will help reduce/eliminate tail wrap. The rabbit hair will give the fly its length and shape. 4) Spread the hair fibers and tie in Zonker strip at the bend of the hook ensuring that only 3-4 mm skin extends past the hook bend. 5) Advance the thread forward to at least 4/5 of the way along the shank, spread the hair fibers and tie in the Zonker strip. Advance the thread further to within 4-5 mm of the eyes and complete the tie in of the Zonker strip. Apply some head cement to ensure the strip does not come undone when a fish is caught. This gap is necessary for you to tie in the wing case, the rubber legs and to dub the neck area. 6) Select 4 Mallard Breast feathers of approximately the same size and strip off only the bottom 2/3 of the feather, leaving the tip full. This ensures that no feather fibers extend below the hook shank. 7) Tie in 2 feathers on each side behind the eyes ensuring that the feathers meet up on top of the Zonker strip tent-wing style. The feathers should flank the Zonker strip along 1/3 of its length. This helps to contain the movement of the Zonker strip and to give the fly the correct shape. 8) Tie in a length of round rubber leg in the space between the eyes and the end of the Zonker strip and adjust/set to position the legs slanting forwards and backwards. Repeat this step on the other side of the hook shank. 9) Dub the neck area, separating the legs and between the eyes. Whip finish and tease out the dubbing so as to create a slight halo around the abdomen. 10) Nip out some of the long base fibers of the Zonker Strip to form a bluntish tail and adjust the length of the abdomen/thorax to 4/5 of total fly length. Rather have a longer abdomen than a too short one. |
|
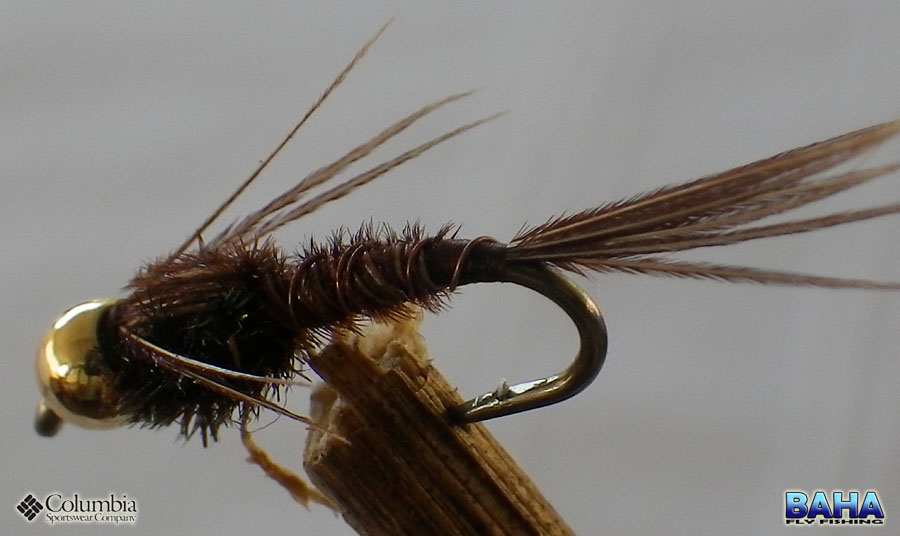
The PTN
The PTN (Pheasant Tailed Nymph) |
|
By Warren Prior |
|
 |
|
Materials |
|
| Hook | #12 – #16 nymph hook (a #14 was used in the demo fly) |
| Thread | Any fine brown thread – The colour must match the colour of the pheasant tail |
| Thorax | Peacock herl (or orange dubbing to tie an orange hot spot) |
| Tail, Body & Wing Casing | Pheasant tail |
| Ribbing | Copper wire |
| Head | An appropriately sized copper bead |
Tying Instructions |
|
| 1) Begin by dropping a bead (I used copped) onto the hook and moving it up to the eye. The bead is important to weight the fly so choose an appropriate bead. Tungsten for example is great for fast moving and deeper waters. Other colour beads can also be experimented with.
2) Dress the hook shank with your chosen thread to provide a solid base to tie the materials onto. Then wind the thread down to the bend of the hook and tie a piece of copper wire which will be used to rib the body and will provide additional strength to the fly. 3) Next tie in around 4 – 6 strands of pheasant tail to create the tail of the fly. Generally the tail should be around the length of the hook shank. 4) Rather than trimming off the pheasant tail (and wasting it) we will use it to form the abdomen. Do so by winding the cotton up the hook to the where you wish the thorax to end (roughly a third of the way down the hook shank from the eye). Now wind the ends of the pheasant tail up to the cotton and tie them off. You can now trim off the remainder. 5) Counter wrap the copper wire over the thorax thus securely trapping it. Tie off the copper wire and trim off any excess. Pheasant tail is a relatively brittle material and often breaks when fighting a fish. This ribbing will therefore give the fly some extra life. Note: Counter wrapping means to wrap in the opposite direction to the material under it. This traps the material more efficiently than wrapping in the same direction. 6) Tie in another 6 strands of pheasant tail by the but, making sure they point towards the tail of the fly. These will be folded over the thorax and will eventually form the wing case and legs. 7) Tie in a few strands of peacock herl and build up a well shaped thorax using them. It should be roughly a third of the length of the fly. Tie these off behind the bead. Note: Dubbing in a thorax instead of using peacock herl provides some great alternative nymphs. If often dub in an orange thorax to tie a form of the orange hot spot for yellowfish. 8) Fold the strands of pheasant tail over the thorax and secure them behind the bead to form the wing casing. 9) At this point you can either cut off the ends of the pheasant tail, or split the strands into 2 groups and fold them down the sides of the fly to form legs. 10) Tie off the fly. You are done. |
|
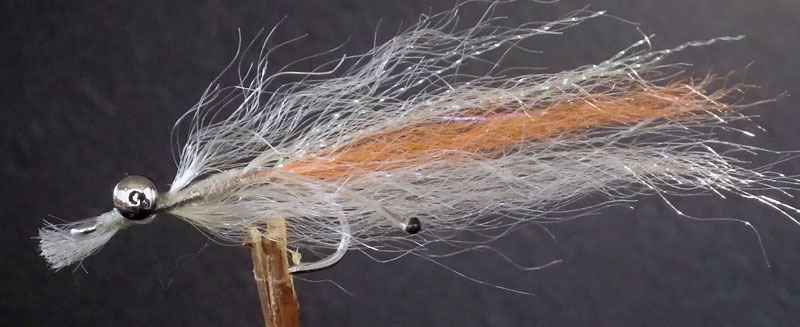
The Bay Shrimp
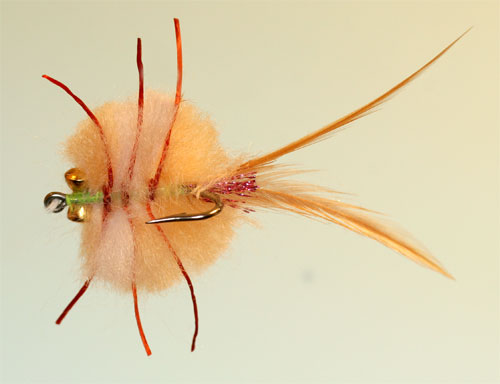
The Bay Shrimp |
|
By Christian Calliontzis |
|
 |
|
Materials |
|
| Hook | Mustad ultra sharp size 6 |
| Thread | 5x tippet or any clear thread |
| Tail | Orange SF blend |
| Body | Shrimp SF blend, mother of pearl flash |
| Eyes | 4mm black dumbell eyes, 55 pound mono |
Tying Instructions |
|
| 1) Add the eyes about 4mm behind the eye of the hook and add a short piece of the orange attractant at the bend the hook as well as a few strands of mother of pearl.
2) Burn the mono so that you get a well-rounded black eye. Pinch the mono flat with pliers and bend slightly then tie facing downwards (Assuming the hook is in the normal position). 3) Tie in a shorter piece of the shrimp body on top and a slightly longer piece below the shorter piece. Remember to keep the fly spars. 4) Back on top add another piece of the shrimp material, tying the thread just behind the eyes. With this piece you must fold over the dumbbell eyes and tie off near the hook eye. 5) Add the final piece of shrimp material. This is the longest and most important part as it is what provides the length and most of the bulk. Tie in as you did with the first fly and again bring the excess forward but instead of trimming the piece off leave a short little piece, almost like a lip on a rapala. Super glue for added durability.
|
|
Peter Brigg’s Wolf Spider
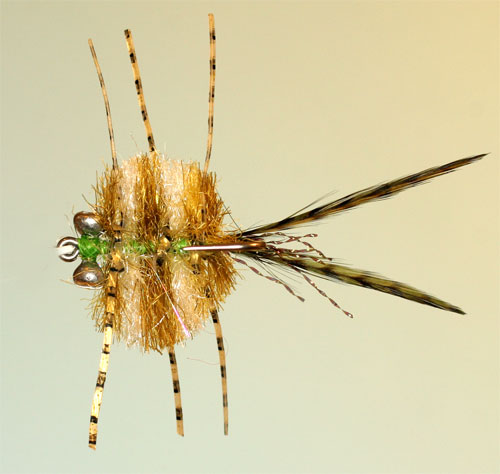
Peter Brigg’s Wolf Spider |
|
By Peter Brigg |
|
 |
|
Materials |
|
| Hook | Grip 11011 BL #14 and #16 |
| Thread | Grip 11011 BL #14 and #16 |
| Body | Foam strip Approximately 3 to 4mm wide to suits fly size |
| Post | Antron or Z Lon |
| Hackle | Sparse ginger from a Cock Cape with fairly long fibers. |
Tying Instructions |
|
| 1) Wrap hook shank with tying thread and attach foam strip at the bend of the hook opposite the barb.
2) You can add under body of peacock herl or dubbing of choice and then pull foam over and secure at a point approximately one third of the hook shank behind the eye. 3) Add post and hackle feather at the tie off point in 2 above. 4) Add legs behind the parachute post (important). First back legs in pairs of Pheasant tail fibers on either side and followed by front legs in the same way. Tie these loosely so that you can pull the butt ends to create the desired leg length for the size of fly, but keep them fairly long. Add a drop of super glue and take an extra couple of wraps to secure the legs before trimming the butt ends 5) Wrap the parachute hackle feather around post with about 4 wraps and tie off, before finally trimming post to desired length. |
|
Brush Fly
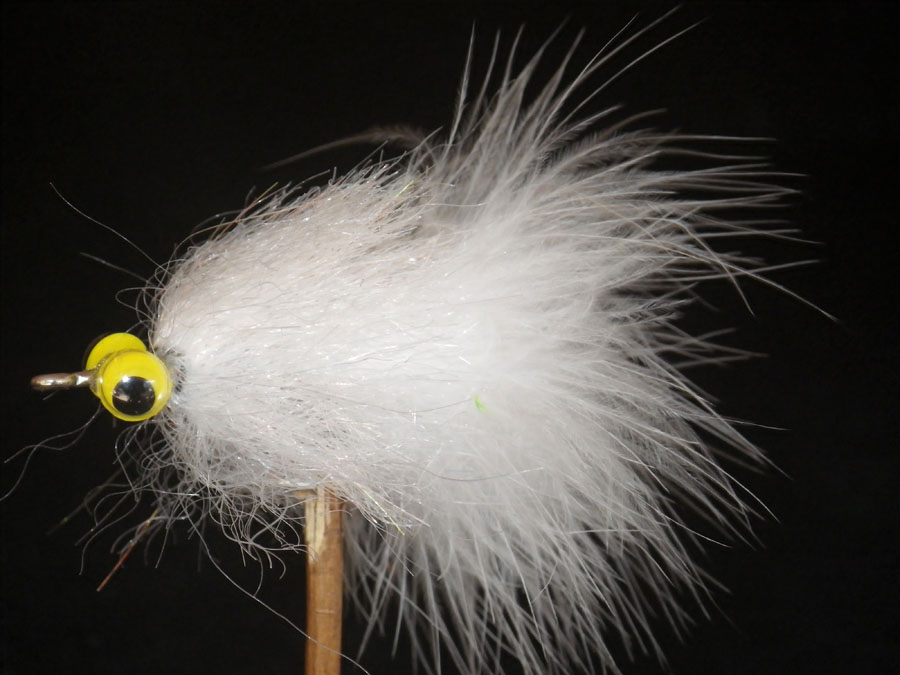
Brush Fly |
|
By Nick Nortje |
|
 |
|
Materials |
|
| Hook | 1/0 stainless steel |
| Thread | White |
| Tail | White marabou |
| Body | White/pearl flash |
| Eyes | Yellow dolls eye |
Tying Instructions |
|
| 1) Buy a brush maker if you have not bought Jay’s awesome new brush maker.
2) Start the cotton about half way down the hook ending just after the barb. 3) Tie in a generous amount of marabou and make a half hitch. 4) Place the brush on the top of the hook going forward and tie it in. Add a drop of super glue for some extra insurance. Pull all the fibres of the brush backwards. 5) Rotate the hook while wrapping the brush around the shank till about ¾ of the way up not forgetting to tease out the fibres using a comb or the fly will not have the required profile. 6) Tie off the brush and build a small cone. Using knot sense or clear epoxy glue your dolls eyes on and allow to dry. You can build up a head should you want extra weight, but again personal preference. Don’t forget to tease out the brush for that awesome action in the water. |
|
Crab Pattern
Crab Pattern |
|
|
|
|
Materials |
|
| Hook | SS Long Shank #3 to #6 |
| Thread | 3/0 or finer colour to match |
| Head | Dumbbell Eyes |
| Pincers | Hen Hackle and Flash |
| Body | Yarn Colour to match natural Tan to Brown Olive |
| Legs | Rubber Legs |
Tying Instructions |
|
| 1) Dress shank of hook and tie in Dumbbell eyes behind the eye.
2) Tie in a small bunch of flash above the barb. 3) Tie in a pair of hen hackles curving outward to simulate the pincers. 4)Reverse the hook in the vice and starting below the barb tie in short lengths of yarn at 90 deg to the shank using figure of 8 method. 5) Repeat with alternate shade to create a striped body. Use 2 of the primary colour to one for the stripe. 6) Repeat this process right up to the dumbbell eyes. 7) Trim the yarn to form a crab shaped body. 8) Tie in the rubber legs using a simple half hitch and trim the legs to length. 9)A very small amount of super glue can be used on the leg knots as well as the dumbbell eyes. 10)This fly can be fished in the surf zone with as sinking line as well as letting it drift in deeper water. |
|
Variation |
|
|
|
|
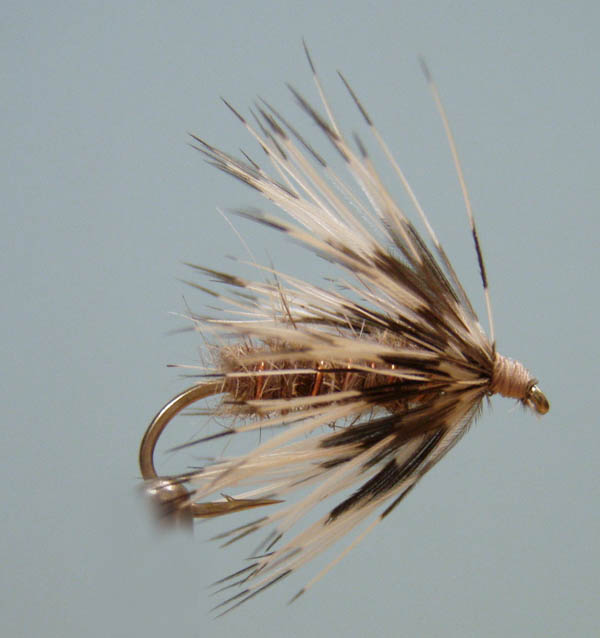
Traditional Soft Hackle
Traditional Soft Hackle |
|
|
|
|
Materials |
|
| Hook | Wet Fly #10 to #18 |
| Thread | 6/0 or finer (colour of choice) |
| Rib | Copper wire |
| Body | Natural Dubbing Colour of choice |
| Wing | Partridge Pheasant or hen Hackle |
Tying Instructions |
|
| 1) Dress shank down to above the barb.
2) Tie in the ribbing. 3) Dub the thread forming a tapered noodle. Note: When viewing from the top the dubbing should be twisted in a clockwise direction to prevent unwinding as it is wrapped around the hook shank. (reverse for Left Handed) 4) Wrap the dubbing forward forming a tapered body. Leave enough room for the hackle and head. 5) Wrap the Ribbing forward through the body in the opposite direction. Tie off. 6) Prepare the feather by clamping the tip in hackle pliers. Then (with the small finger of the right hand in the hackle pliers loop and the left hand holding the feather taught) with the shiny side up using the thumb and fore finger of the right hand stroke the fibres down and back. Repeat the process until the fibres on both side of the quill are against each other. 7) Remove hackle pliers from the feather and tie the prepared feather in by the tip with fibres facing back and the quill vertical. 8) Now wrap the feather in 3 or 4 close wound wraps forward toward the hook eye and tie off. 9) Form a neat thread head, whip finish and varnish. |
|
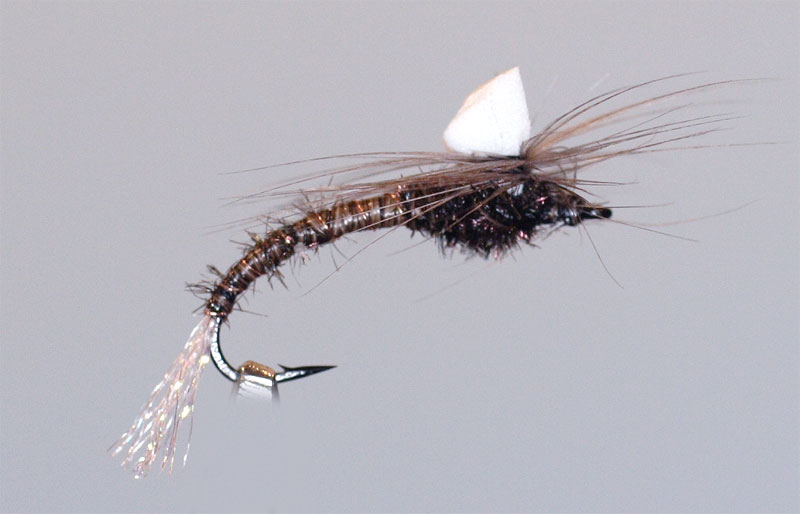
Klinkhammer Variant
Klinkhammer Variant |
|
A trout fly variation tied by Peter Brigg. |
|
|
|
|
Materials |
|
| Hook | Partridge 15BNX ‘Klinkhamer Extreme’ 12-16 |
| Thread | Black 6/0 or finer |
| Shuck | Antron fibres or stretched slingwrap film |
| Body | Stripped Peacock Hurl |
| Rib | Fine Copper Wire |
| Wing | Closed cell foam and hackle |
| Thorax | Peacock Hurl |
Tying Instructions |
|
| 1) Dress the hook shank with thread.2) Tie in the thin strip of foam on top of the hook about 1/3 back from the eye. Secure with fig of 8 wraps and then wrap around base above hook and fold upward to form a wing post.
3) Tie in the strands of antron at the bend of the hook to form the shuck. 4) At the same point tie in the rib and the stripped peacock hurl. 5) Wrap the hurl forward to behind the wing forming a tapered body and tie off. 6) Wrap the rib in even turns to the same point and tie off. 7) Tie in the hackle butt end under the wing and bend at 90 deg. so it is pointing toward you. 8) Tie one or two strands peacock hurl under wing and wrap behind and in front to form a neat thorax. Tie off. 9)Wrap the hackle around the base of the foam wing, tie off and form a small head with the thread. Whip finish and cement if desired. 10) Trim the foam wing to shape. |
|
 D5 Creation