
Bass
now browsing by category
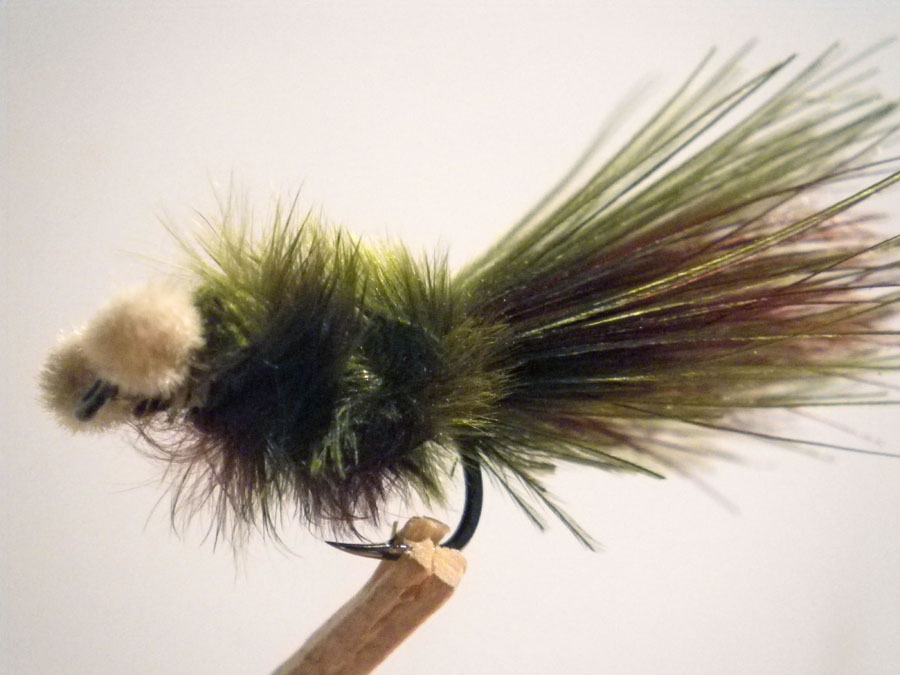
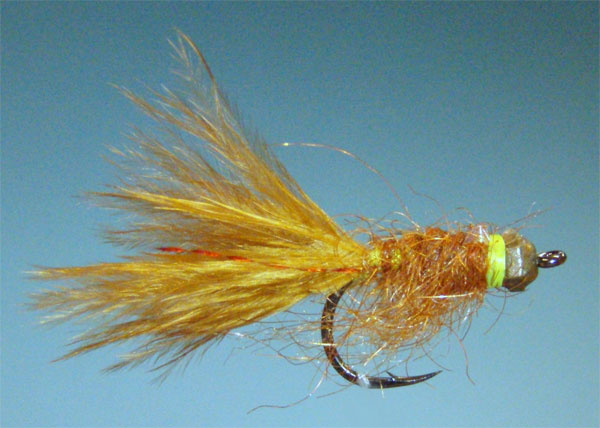
Kamberg Nymph
Kamberg Nymph |
|
By Mike Blackhouse |
|
 |
|
Materials |
|
| Hook | TMC 9300 #10 or equivalent |
| Thread | 3/0 tan or olive |
| Tail | Blood quill marabou olive together with a few Blood Quill marabou fibers in brown |
| Body | Same as for tail |
| Eyes | Tan chenille |
| Weight | 7 to 14 turns of .010 lead wire |
Tying Instructions |
|
| 1) Lay a thread base from the eye to the bend of the hook building up the thread at the bend to support the tail.
2) Tie in the chenille eyes figure of eight style leaving the tags attached to be used later. 3) Wind in 7 to 14 turns of lead wire starting directly behind the eyes wrapping towards the bend. 4) Tie in olive and brown blood quill marabou. The tail should be 1.5 length of the hook shank. Make sure that the tail is tied in behind the thread mounting at the bend of the hook so it stands up proud and tail wrap is largely avoided. 5) Twist and wrap the rest of the marabou fibers back to the eye of the hook. Pull hard on the thread as you tie off so that the fly does not become unwound during use. 6) You will find that there is a very small gap between the tie off point and the eyes which will be filled with dubbed olive and brown marabou fibers. The next move is to tie off between the chenille eyes and at the eye of the hook. 7) It is important to have a good quality pair of curved scissors as the tail needs be cut to shape of a dragon abdomen and also this helps further to avoid tail wrap. |
|
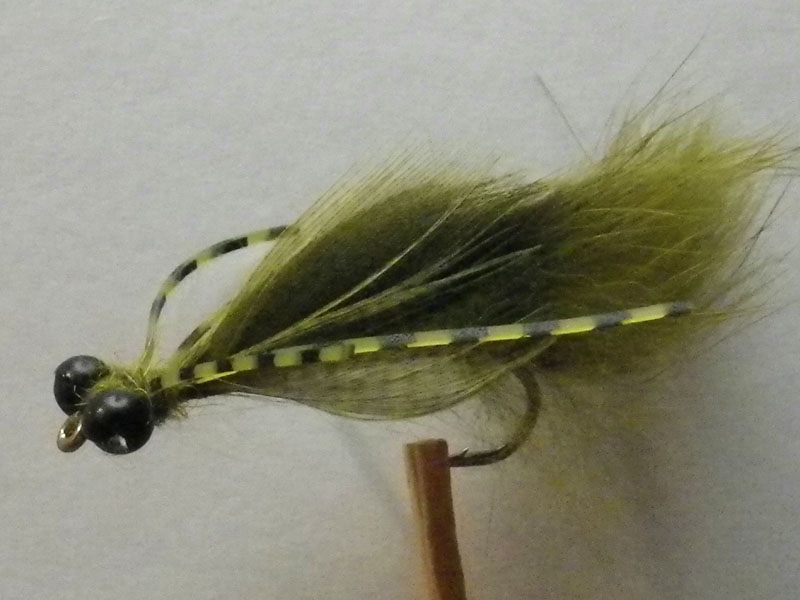
Papa Roach
Papa Roach |
|
By Marco Breschi |
|
 |
|
Materials |
|
| Hook | 3X shank-wide gape (wet/nymph type) in #6 or #8 |
| Thread | Olive or brown 0/6 |
| Tail | Zonker strip (part of the body) |
| Body | Olive or brown zonker strip (preferably short fibred) |
| Eyes | Large black, round plastic beads |
| Wing case | Olive or brown Mallard breast feathers (2 on each side) |
| Thorax/head | Olive/brown dubbing mixed with fur from zonker |
| Legs | Round rubber in olive or brown |
Tying Instructions |
|
| 1) Lay a thread foundation to the gape of the hook and coat with a layer of head cement (Sally Hanson’s).
2) Tie in the eyes just behind the eye of the hook leaving sufficient space for tying off. 3) Select a suitable section of Zonker strip and measure off against the hook shank allowing only 3-4 mm skin to extend past the hook bend. This will help reduce/eliminate tail wrap. The rabbit hair will give the fly its length and shape. 4) Spread the hair fibers and tie in Zonker strip at the bend of the hook ensuring that only 3-4 mm skin extends past the hook bend. 5) Advance the thread forward to at least 4/5 of the way along the shank, spread the hair fibers and tie in the Zonker strip. Advance the thread further to within 4-5 mm of the eyes and complete the tie in of the Zonker strip. Apply some head cement to ensure the strip does not come undone when a fish is caught. This gap is necessary for you to tie in the wing case, the rubber legs and to dub the neck area. 6) Select 4 Mallard Breast feathers of approximately the same size and strip off only the bottom 2/3 of the feather, leaving the tip full. This ensures that no feather fibers extend below the hook shank. 7) Tie in 2 feathers on each side behind the eyes ensuring that the feathers meet up on top of the Zonker strip tent-wing style. The feathers should flank the Zonker strip along 1/3 of its length. This helps to contain the movement of the Zonker strip and to give the fly the correct shape. 8) Tie in a length of round rubber leg in the space between the eyes and the end of the Zonker strip and adjust/set to position the legs slanting forwards and backwards. Repeat this step on the other side of the hook shank. 9) Dub the neck area, separating the legs and between the eyes. Whip finish and tease out the dubbing so as to create a slight halo around the abdomen. 10) Nip out some of the long base fibers of the Zonker Strip to form a bluntish tail and adjust the length of the abdomen/thorax to 4/5 of total fly length. Rather have a longer abdomen than a too short one. |
|
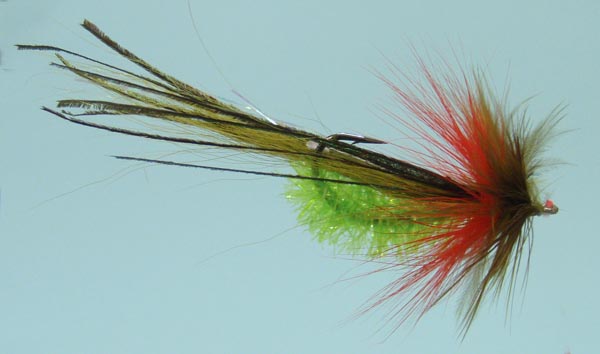
Backwater Bass Bent Back
Backwater Bass Bent Back |
|
|
|
|
Materials |
|
| Hook | Stinger 2/0 or bigger |
| Thread | Red or Olive 3/0 |
| Flash | Of Choice |
| Body | Chartreuse Cactus Chenille |
| Tail | Olive Buck tail and Peacock Hurl |
| Head | Red and Olive Hackle |
Tying Instructions |
|
| 1) Prepare the hook by putting in a slight bend about 1/3 from eye. Bend just enough to get the hook to swim point up.
2) Starting right from within the bend of the hook wrap the cactus chenille forward to the bend and tie off. 3) Tie in a clump of buck tail on top of the shank at the bend. (hook point up). This must extend beyond the hook and also acts as a weed guard by protecting the hook point. 4) Tie in some flash above the buck tail. This can be slightly longer than the buck tail.. 5) Top of with 5 or 6 peacock hurls. 6) Just ahead of the Buck tail tie in a red hackle buy the base, curved side down and wrap forward in tight turns forming a neat collar. 7) Just in front of the red repeat with an Olive hackle. 8) Form a neat thread head, whip finish and cement. |
|
Variation |
|
|
|
|
MSK (Mikes Scalie Killer)
MSK (Mikes Scalie Killer) |
|
A yellowfish variation of the woolly bugger. |
|
|
|
|
Materials |
|
| Hook | Daiichi DHSS #3 or smaller |
| Thread | Chartreuse 3/0 or finer |
| Head | Tungsten Bead pref. faceted |
| Tail | Filoplume from Schlappen Hackle + Flash |
| Body | Sparkle dubbing |
| Rib | Fine Copper Wire (optional) |
| Wing Case | Flashabou |
| Legs | Teased out dubbing |
Tying Instructions |
|
| 1) Thread bead onto hook and dress the hook shank with thread to above the barb.
2) Cut a bunch of filoplume from the base of a hen hackle. Tie this in above the barb using the pinch method. 3) Tie in one strand of flash either side of tail as well as the copper wire for rib if desired. 4) Form a dubbing noodle at the tail tie in point and wrap forward 2/3 along hook shank forming the body. 5) At this point tie in the flash for the wing case on top of the hook. 6) Carry on dubbing in front of the flash right up to the bead. 7) Pull the flash over the top forming the wing case and tie off behind the bead. 8) Keep wrapping the chartreuse thread behind the bead forming a neat chartreuse band behind the bead. 9)Whip finish and apply a small amount of head cement. 10) This fly is very effective for Natal Scalies especially when the water is not clear and can be tied in browns and greens. |
|
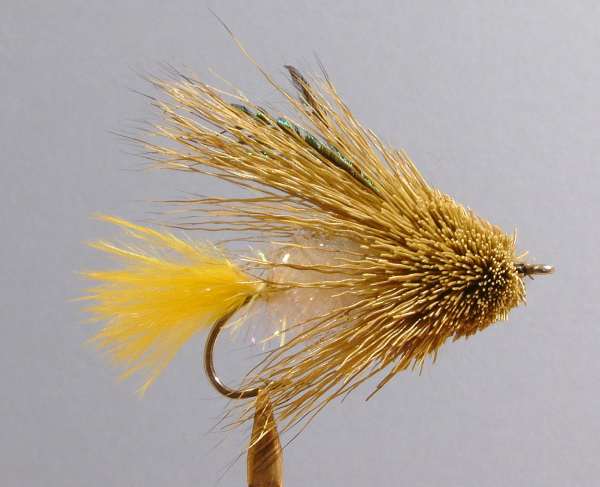
Marco’s Bass Muddler
Marco’s Bass Muddler |
|
Marco’s variation on the bass muddler. |
|
|
|
|
Materials |
|
| Hook | Size #4 long Shank |
| Thread | 3/0 Mono Colour to match |
| Overbody | Flourescent Fritz or Chenille (Crystal) |
| Wing | Deer Hair topped with Marabou and Peacock Herl |
| Collar | Spun Deer Hair |
| Head | Spun deer hair clipped to shape |
| Tail | Marabou or Bucktail (red orange chartreuse) |
Tying Instructions |
|
| 1. Start thread above barb of hook and tie in flat section of foam.
2. Tie in the tail (1/3 length of hook shank) and fritz. Wind the thread forward to about 1/2 the shank length from the eye. 3. Wind the fritz forward over the foam and tie off at the same point. 4. Stack a clump of deer hair in a stacker and tie in directly in front of the Fritz on top of the hook. The tips should extend to the bend in the hook. 5. Tie in a small bunch of marabou directly over the deer hair (colour of choice) and 4-5 Peacock Herls directly on top of that. 6. Stack a thick clump of deer hair in the stacker and spin a collar around the hook shank. 7. Repeat the above step (stacking no longer required) over and over until the front third of the shank is covered. make sure to pack the hair tightly back after each application. 8. Tie off the thread behind the hook eye and apply a drop of head cement, then shape the head with scissors or a sharp razor blade. The larger the head and collar the better the pattern will float. Note: The collar particularly the bottom provides most of the buoyancy to the fly. Clipping the bottom close to the hook shank results in a loss of buoyancy thus allowing the fly to fish sub surface. |
|
Fishing Instructions |
|
| Due to the wind resistance of the pattern at least a 5/6 weight rod is required. Cast in the direction of the bank (as close as possible) or structure, allow to settle for a few seconds then give a a few rapid short strips interspersed with pauses of a few seconds. Continue to strip until over the drop off and the repeat the sequence gradually covering all the water in front of you. The idea is to create sufficient disturbance to test the agression of the bass. By the way many a wary trout has been caught in the shallows in the early morning and late evenings on windy/stormy days. | |

Natal Minnow
Natal Minnow |
|
This fly was originally tied by Robin Fick. Recipe courtesy of Eric Pattenden. |
|
|
|
|
Materials |
|
| Hook | #4 to #10 Long Shank |
| Thread | Red |
| Head | Black Thread |
| Tail | Black Hackle |
| Body | Red Thread |
| Wings | 18 Selected Mallard Flank Feathers |
| Hackle | Red Hen |
Tying Instructions |
|
| 1) Dress the hook with thread to above hook barb.2) Tie in the tail at this point. The tail length should be 1 to 1.5 times hook shank length.
3) From the tail tie in point dress the hook with Red thread to where the head would start and tie off. (Eric says that chenille should not be used as it is too bulky and the feathers would not lie flat.) 4) Sort the feathers into 3 groups of 6 equally sized feathers. the 6 tail end feathers should be the smallest and the head end feathers the largest. These must be the full length of the body and will end just past the hook bend. Measure the feathers against the hook and strip the fibres below the tie in point. 5) Tie in the first feather about 1/4 up the shank as shown in the picture above. The tip of the feather should be just past the hook bend. The feather must be parallel to the hook bend. Tie in two more matched feathers. If the feathers have a bias it should be downward. Then repeat on the back of the fly. Note: The stripped portion of the quill should extend to the next tie in point. 6) In loose turns take the thread forward to the next tie in point trapping the stripped stems to the sides of the hook. 7) Now tie in the next set of feathers as described above with the lining up with the first set. Then in loose turns bring the thread to the final tie in point behind the head. 8) Keeping the best feathers for the outside of the fly tie in the last set as before. This set forms the full body of the fly and should extend to the tips of the first set of feathers. 9) Next tie in a red hackle just in front of the last tie in point. After 3 or 4 turns tie off and form a neat head with the black thread. The red hackle should be forced back over the body feathers as the head is tied in forming a swept back collar around the body feathers. 10) Varnish the head with you favourite head cement. 11) The fly is traditionally tied with mallard flank feathers (partridge used in the demo tying sequence) Experimenting with different types of feathers can produce interesting results. |
|
Bass Muddler
Bass Muddler |
|
Due to the wind resistance of the pattern at least a 5/6 weight rod is required. Cast in the direction of the bank (as close as possible) or structure, allow to settle for a few seconds then give a a few rapid short strips interspersed with pauses of a few seconds. Continue to strip until over the drop off and the repeat the sequence gradually covering all the water in front of you. The idea is to create sufficient disturbance to test the agression of the bass. By the way many a wary trout has been caught in the shallows in the early morning and late evenings on windy/stormy days. |
|
|
|
|
Materials |
|
| Hook | SS Size #4 long Shank |
| Thread | 3/0 Mono Colour to match |
| Underbody | White or Black Foam (optional) |
| Overbody | Fluorescent Fritz or Chenille (Crystal) |
| Wing | Deer Hair topped with Marabou and Peacock Herl |
| Collar | Spun Deer Hair |
| Head | Spun deer hair clipped to shape |
| Tail | Marabou or Bucktail (red orange chartreuse) |
Tying Instructions |
|
| 1. Start thread above barb of hook and tie in flat section of foam.2. Tie in the tail (1/3 length of hook shank) and fritz. Wind the thread forward to about 1/3 the shank length from the eye.3. Wrap the foam in overlapping turns toward the hook eye and tie it off when the end of the thread is reached.
4. Wind the fritz forward over the foam and tie off at the same point. 5. Stack a clump of deer hair in a stacker and tie in directly in front of the Fritz on top of the hook. The tips should extend to the bend in the hook. 6. Tie in a small bunch of marabou directly over the deer hair (colour of choice) and 4-5 Peacock Herls directly on top of that. 7. Stack a thick clump of deer hair in the stacker and spin a collar around the hook shank. 8. Repeat the above step (stacking no longer required) over and over until the front third of the shank is covered. make sure to pack the hair tightly back after each application. 9. Tie off the thread behind the hook eye and apply a drop of head cement, then shape the head with scissors or a sharp rasor blade. The larger the head and collar the better the pattern will float. Note: The collar particularly the bottom provides most of the buoyancy to the fly. Clipping the bottom close to the hook shank results in a loss of buoyancy thus allowing the fly to fish sub surface. The foam in this type of application should also be omitted. |
|
 D5 Creation