Fresh Water Fly
now browsing by category
Posted by: Warren Prior | on October 14, 2012
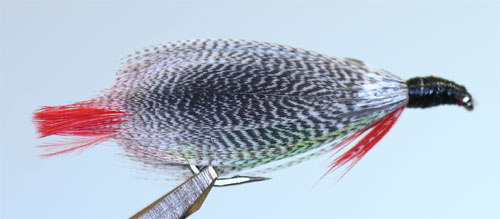
Natal Minnow
Natal Minnow |
|
This fly was originally tied by Robin Fick. Recipe courtesy of Eric Pattenden. |
|
|
|
|
Materials |
|
| Hook | #4 to #10 Long Shank |
| Thread | Red |
| Head | Black Thread |
| Tail | Black Hackle |
| Body | Red Thread |
| Wings | 18 Selected Mallard Flank Feathers |
| Hackle | Red Hen |
Tying Instructions |
|
| 1) Dress the hook with thread to above hook barb.2) Tie in the tail at this point. The tail length should be 1 to 1.5 times hook shank length.
3) From the tail tie in point dress the hook with Red thread to where the head would start and tie off. (Eric says that chenille should not be used as it is too bulky and the feathers would not lie flat.) 4) Sort the feathers into 3 groups of 6 equally sized feathers. the 6 tail end feathers should be the smallest and the head end feathers the largest. These must be the full length of the body and will end just past the hook bend. Measure the feathers against the hook and strip the fibres below the tie in point. 5) Tie in the first feather about 1/4 up the shank as shown in the picture above. The tip of the feather should be just past the hook bend. The feather must be parallel to the hook bend. Tie in two more matched feathers. If the feathers have a bias it should be downward. Then repeat on the back of the fly. Note: The stripped portion of the quill should extend to the next tie in point. 6) In loose turns take the thread forward to the next tie in point trapping the stripped stems to the sides of the hook. 7) Now tie in the next set of feathers as described above with the lining up with the first set. Then in loose turns bring the thread to the final tie in point behind the head. 8) Keeping the best feathers for the outside of the fly tie in the last set as before. This set forms the full body of the fly and should extend to the tips of the first set of feathers. 9) Next tie in a red hackle just in front of the last tie in point. After 3 or 4 turns tie off and form a neat head with the black thread. The red hackle should be forced back over the body feathers as the head is tied in forming a swept back collar around the body feathers. 10) Varnish the head with you favourite head cement. 11) The fly is traditionally tied with mallard flank feathers (partridge used in the demo tying sequence) Experimenting with different types of feathers can produce interesting results. |
|
Posted in Bass, Fly Tying, Fresh Water Fly, Trout | No Comments »
Posted by: Warren Prior | on October 14, 2012
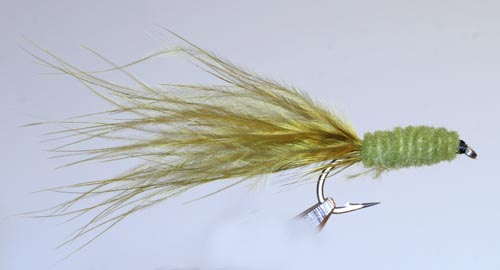
Olive Tadpole (Plattie)
Olive Tadpole (Plattie) |
|
This fly is fished with a floating line in rip currents in surf, bays or estuaries. |
|
|
|
|
Materials |
|
| Hook | Stainless Steel 2xLong #1 to 2/0 |
| Thread | Clear Mono |
| Tail | A small bunch of Calf Tail with 2 strands Flash both Sides. |
| Body | Flash or sparkle dubbing. Mylar Tube pulled over hook eye tied in above barb |
| Eyes | Bead Chain tied in on top of hook just behind eye |
Tying Instructions |
|
| 1) Dress hook2) Tie in small tuft of deer hair above hook point – helps reduce tail wrapping
3) Tie in tail of marabou 2-3 times length of hook shank above deer hair. Make one wrap of thread around the marabou only to keep it concentrated on the top of the hook shank again helps reduce tail wrapping 4) Wrap lead wire along centre half of the length of the hook shank and double back wrapping second layer to make a “ball” shape. The lead results in a dipping action on the retrieve. 5) Tie in chenille at tail and advance thread to hook eye. In process of this build up small “cone” of thread in front of the lead wire this helps the chenille transition from the lead to hook shank and prevents lead sliding forward 6) Wrap chenille forward to hook eye to form the body 7) Tie off chenille, trim and whip finish Alternatively it can be tied in black. In South Africa this fly imitates platana tadpoles that are often olive. Hence the name Plattie |
|
Fishing Instructions |
|
| Fish this fly over weed beds, along reed banks or in shallows using figure of 8 retrieve or short erratic pulls to create a darting movement. When fish are swimming circuits in the shallows allow the fly to rest on the bottom in the path of fish and give a short tug as the fish approaches.
(While fishing a lake one weekend there was a 2-3lb Brown cockfish that kept swimming a specific circuit through an area of the shallows, every time I tried to present a fly it spooked and disappeared for 15-20 minutes. Eventually I put the fly on the bottom and waited, as the fish approached I gave a 6 inch in tug this elicited a charging take and the fish was on!) |
|
Posted in Fly Tying, Fresh Water Fly, Trout | No Comments »
Posted by: admin | on October 14, 2012
Funnel Dun
Funnel Dun |
|
The Funnel Dun is a fly which Jack Blackman first introduced to us when we were still Natal Fly Dressers Society, Durban Branch – a long time ago. |
|
|
|
|
Materials |
|
| Hook | An up-eyed dry fly hook is preferred but a down-eyed dry fly hook works as well, sizes 12 to 18 |
| Thread | 6/0 – in colour to suit your chosen scheme |
| Thorax | Any dubbing material, usually darker than the abdomen. Hares Ear blend works well. |
| Hackle | Long barbuled cock hackle – colour to suit (I prefer a length of 1,5 times the hook shank) |
| Body | Soft fur dubbing of colour to suit |
| Tail | Same as for hackle – again 1,5 times the length of the shank. |
Tying Instructions |
|
| 1 : Place hook in vice, secure the thread and take it to a position just past the eye. Form a dubbing noodle with your selected material and form a neat thorax just behind the eye. The thorax should have a diameter of about a fifth to a quarter of the shank length.
2: Strip the flue off the hackle and tie the stem in at the back of the thorax, with shiny side out. Trim off the excess stem and wind the hackle backward (towards the hook bend) two to three times around the shank and tie off. Shape the hackles so that they form a funnel shape over the thorax. This is done by holding the hackle tips in the fingers of the one hand and winding the thread loosely up the barbules with the other hand and then back again. This should keep the hackle in the funnel shape. If the thread is wrapped too tightly the barbules will splay in all directions. 3: Wind the thread to a position above the barb and tie in three or four barbules for the tail. By holding the barbules down with your left hand, wind the thread to about a quarter of the way around the bend. Take the thread back to behind the hackle.Step 4: Dub body material onto the thread and form a tapered body by winding back to the tail. Tie off at the tail with a whip finish. The tie off can also be done with a yellow colour thread to imitate an egg laying insect. Happy hunting! |
|
Posted in Fly Tying, Fresh Water Fly, Trout | No Comments »
Posted by: Warren Prior | on October 14, 2012
Hare & Copper
Hare & Copper |
|
This fly was tied for us at the July meeting by Paul Gregg. |
|
|
|
|
Materials |
|
| Hook | 3x strong nymph #16 – 12 |
| Thread | Hyperfine black or any suitable fine thread |
| Tail | Seal guard hair |
| Body | Hares Ear and Antron dubbing mix |
| Rib | Fine Copper Wire |
| Hackle | Black or Reddish Brown |
| Weight | 6 turns Siman square lead (size dependant on weighting required) |
Tying Instructions |
|
| Wrap 6 turns of square lead around shank and position leading edge 1/2 way down shank. Select bunch of seal hair, clip and remove underfur. (Keep this for dry fly dubbing).Tie in and bind down on top of the shank to beginning of lead. Clip off excess and tie down forming a smooth transition to the lead.Tie in the copper rib on the side of the hook so that it’s leading edge is secured behind the junction of lead and shank this will ensure that the first ribbing wrap crosses over the vulnerable tail tie in spot on top of the hook. This will present a smooth uniform underbody for your dubbing.
Bind in the rib to a position between the barb and point of the hook. Lightly apply tack to the thread and touch the dubbing lightly to the thread. DO NOT OVER DUB. Now roll the dubbing tightly onto the thread and wind up to junction of shank and lead. Rib through with copper wire right to behind the eye of the hook. This will give the fly extra weight at little additional bulk. Again add tack to the thread and apply dubbing. This time do not dub tightly to the thread as you need the bulk of the thorax plus the movement. I lay a foundation of zig zag dubbing before finally running the finished layer in close turns. This gives security to the underlying dubbing and prevents it from coming off the fly adding durability. I don’t bother to pick out the thorax as the lightly dubbed hares ear is very spikey besides a few fish and it is as buggy as you will want. |
|
Posted in Fly Tying, Fresh Water Fly, Trout | No Comments »
Posted by: Warren Prior | on October 14, 2012
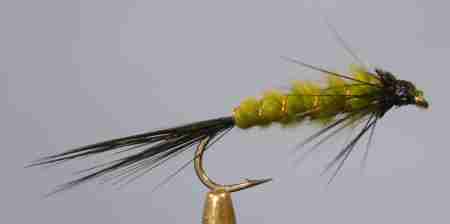
Coleford Limey
Coleford Limey |
|
This fly is a Peter Briggs Creation which he first tied and fished at Coleford in 1992. It proved so successful that it attained almost legendary status as a taker of trout with his angling companions. Peter in the true spirit of a fly fisherman shared the recipe and creation of this fly with us at the October 2002 meeting of the Durban Fly Tyers. |
|
|
|
|
Materials |
|
| Hook | Nymph #12 to #16 2x or 3x |
| Thread | Black |
| Tail | A small bunch of black Hackle |
| Body | Lime or Olive Green Marabou |
| Rib | Fine Copper Wire |
| Hackle | Black or Reddish Brown |
| Weight | Lead wire if Required Brass Bead if preferred |
Tying Instructions |
|
| Dress the hook with thread to a point opposite the barb. Tie in a small bunch of Black Hackle fibers and the ribbing at the same point.Strip a bunch of marabou fibers from the quill and tie in by the points, Wind the thread up to near the eye of the hook.Twist the marabou fibers into a rope an wind forward in touching turns to form the body. Stroke the fibers back between each turn. Tie off allowing space for the hackle and head. Trim excess marabou.
Bring the ribbing forward in 3-4 even turns (opposite direction to body) making sure you do not trap the marabou fibers. Tie off and trim. Tie in the hackle by the tip and wind forward in 4 even turns stroking back between turns. Tie off and trim just behind the eye. When forming the head pull the hackle fibers back and trap at the base with a few loose turns. The hackle fibers must lie back over the body. Finish the head neatly. Tie off and varnish. |
|
Posted in Fly Tying, Fresh Water Fly, Trout | No Comments »
Posted by: Warren Prior | on October 14, 2012
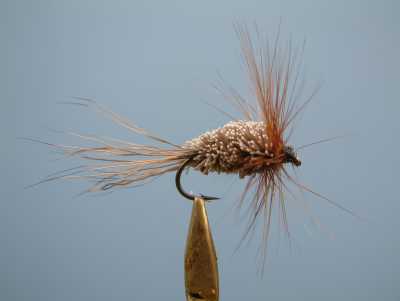
Elk Hair Caddis Variation
Elk Hair Caddis Variation |
|
The Elk Hair Caddis Variation is a favourite of mine both for rivers and still waters. It can be fished as an adult caddis imitation or even a small hopper at times. Size can vary from #12 for still waters mainly down to size #18 for small streams. I think the optimal sizes are #14 and #16. It floats well and can be easily seen on the water. Although it floats fairly low in the surface film, like the natural caddis it can be skated easily across the water. |
|
|
|
|
Materials |
|
| Hook | Traditional straight shank hook with wide gape |
| Thread | Black |
| Tail | Deer hair |
| Body | Peacock herl. (Experiment with other colours of dubbing.) |
| Wing | Deer Hair |
| Hackle | Grizzly or Badger |
Tying Instructions |
|
| 1) Tie in tying thread and wrap in touching turns to a point opposite the barb.
2) Tie in a short sparse bunch of deer hair as the tail. Take 2 loose turns around the shank and deer hair and then two tight turns next to this on the eye side of the hook to prevent flaring of the tail. 3) Add peacock herl o dubbing o choice to create the abdomen/thorax finishing at a point 2/3 the way back along the shank and secure. 4) Add the deer hair wing at the point you finished the abdomen, sloping it over the back with the tips finishing just short of the ends of the tail. Take two loose turns of thread around the shank and deer hair and then two tight turns next to this on the eye side of the hook to prevent flaring of the wing. Try and prevent the wing from lifting two high off the shank. Ideally it should lie across the top of the abdomen. 5) Tie in a hackle as you would for a dry fly, with fibres about width of the gape. 6) Wind the hackle forward in a few turns keeping it sparse, and secure behind the eye, leaving enough space to create a neat small head. 7) Finish the head with tying thread, whip finish and apply varnish. |
|
Posted in Fly Tying, Fresh Water Fly, Trout | No Comments »
Posted by: Warren Prior | on October 14, 2012
Tiger Bugger
Tiger Bugger |
|
This fly imitates a small bait fish (including juvenile tigers), and is viciously attacked by the larger tiger fish due to the territorial and aggressive nature of the tiger fish, especially in rapids. |
|
|
|
|
Materials |
|
| Hook | Kamasan (Deep Water Salmon) #2 or Mustad SS 34011 #4 |
| Thread | Black 3/0 |
| Tail | Marabou (white, orange, red); Crystal Flash (silver, pearl) |
| Body | Mylar tubing / minnow body (pearl, silver); saddle hackle (white) |
| Eyes | Nymph bead |
Tying Instructions |
|
| 1. Position nymph bead on hook against hook eye.
2. Dress hook with thread and position over barb of hook. 3. Tie in the tail (1/3 length of hook). 4. Build up body to suit minnow tubing diameter, starting at the base of the tail and ending at the nymph bead head. 5. Slip minnow body / mylar tubing over cylindrical body and tie behind head and at the base of the tail. 6. Tie in saddle hackle at base of tail and palmer wind forward and tie off behind bead head. 7. Super glue base of tail and behind bead head. |
|
Posted in Fly Tying, Fresh Water Fly, Tigerfish | No Comments »
Posted by: Warren Prior | on October 14, 2012
Bass Muddler
Bass Muddler |
|
Due to the wind resistance of the pattern at least a 5/6 weight rod is required. Cast in the direction of the bank (as close as possible) or structure, allow to settle for a few seconds then give a a few rapid short strips interspersed with pauses of a few seconds. Continue to strip until over the drop off and the repeat the sequence gradually covering all the water in front of you. The idea is to create sufficient disturbance to test the agression of the bass. By the way many a wary trout has been caught in the shallows in the early morning and late evenings on windy/stormy days. |
|
|
|
|
Materials |
|
| Hook | SS Size #4 long Shank |
| Thread | 3/0 Mono Colour to match |
| Underbody | White or Black Foam (optional) |
| Overbody | Fluorescent Fritz or Chenille (Crystal) |
| Wing | Deer Hair topped with Marabou and Peacock Herl |
| Collar | Spun Deer Hair |
| Head | Spun deer hair clipped to shape |
| Tail | Marabou or Bucktail (red orange chartreuse) |
Tying Instructions |
|
| 1. Start thread above barb of hook and tie in flat section of foam.2. Tie in the tail (1/3 length of hook shank) and fritz. Wind the thread forward to about 1/3 the shank length from the eye.3. Wrap the foam in overlapping turns toward the hook eye and tie it off when the end of the thread is reached.
4. Wind the fritz forward over the foam and tie off at the same point. 5. Stack a clump of deer hair in a stacker and tie in directly in front of the Fritz on top of the hook. The tips should extend to the bend in the hook. 6. Tie in a small bunch of marabou directly over the deer hair (colour of choice) and 4-5 Peacock Herls directly on top of that. 7. Stack a thick clump of deer hair in the stacker and spin a collar around the hook shank. 8. Repeat the above step (stacking no longer required) over and over until the front third of the shank is covered. make sure to pack the hair tightly back after each application. 9. Tie off the thread behind the hook eye and apply a drop of head cement, then shape the head with scissors or a sharp rasor blade. The larger the head and collar the better the pattern will float. Note: The collar particularly the bottom provides most of the buoyancy to the fly. Clipping the bottom close to the hook shank results in a loss of buoyancy thus allowing the fly to fish sub surface. The foam in this type of application should also be omitted. |
|
Posted in Bass, Fly Tying, Fresh Water Fly | No Comments »
Posted by: Warren Prior | on October 14, 2012
DDD
DDD |
|
Tom Sutcliffe is the originator of this fly which was named after Bill Duckworth who had considerable success fishing this fly in the Dargle area. Hence the name Duckworth’s Dargle Delight. |
|
|
|
|
Materials |
|
| Hook | Dry #12 to #16 2x |
| Thread | Black |
| Tail | Deer Hair |
| Body | Spun Deer Hair |
| Hackle | Ginger Cock |
Tying Instructions |
|
| Take a small clump of Deer hair and tie in a tail.Take a larger clump of Deer hair remove fluff and spin just ahead of the tail.
Repeat this step 3 to 4 times leaving enough room for the hackle and head. Remove from the vice and trim the deer hair to a cone shape. Make sure to trim very short under the hook shaft to expose the gape of the hook. Tie in the hackle by the base and wind forward in 4 even turns stroking back between turns. Tie off and trim just behind the eye. When forming the head pull the hackle fibers back and trap at the base with a few loose turns. The hackle fibers must lie back against the body. Finish the head neatly. Tie off and varnish. |
|
Posted in Fly Tying, Fresh Water Fly, Trout | No Comments »
Posted by: Warren Prior | on October 14, 2012
Bead Head Caddis
Bead Head Caddis |
|
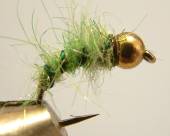
This simple fly works well for both Yellowfish and Trout and can be effectively fished in rivers and still waters. |
|
|
|
|
Materials |
|
| Hook | Scud #12 to #16 |
| Thread | To match Dubbing |
| Rib | Green Wire (Gold or Copper) |
| Body | Life Cycle Dubbing Bright Green (Brown,Tan or Olive) |
| Eyes | Brass or Tungsten Bead |
Tying Instructions |
|
| Dress the hook with thread behind the eye until the bead sits snug. Seat with a drop of super glue.Tie in the Rib right back to 1/3 into the bend of the hook.
Form a dubbing loop at this point and spin a tapered dubbing thread. Wind forward to behind Bead forming a tapered curved body. Secure with thread and tie off. Wind the rib forward in the opposite direction and secure behind bead. Apply a tiny bit of super glue to the thread before tying off. |
|
Posted in Fly Tying, Fresh Water Fly, Trout, Yellowfish | No Comments »

 D5 Creation